

Businesses, social media managers, and content creators need to post consistently across multiple platforms to maintain an active online presence and engage their audiences.
But scheduling and publishing posts manually across multiple platforms can be time-consuming and repetitive. An AI-powered social media scheduler can automate this process by generating content, optimising posts, and scheduling them across multiple platforms from a single interface.
In this tutorial, you’ll learn how to build an AI-powered social media post scheduler using an LLM (Claude, Gemini, or an OpenAI model), the Zernio API, and Next.js.
You’ll use the LLM to generate engaging social media content from user prompts, Next.js to build the application’s frontend and backend, and the Zernio API to schedule and publish posts across multiple social media platforms through a single API integration.
Table of Contents
What is Zernio?
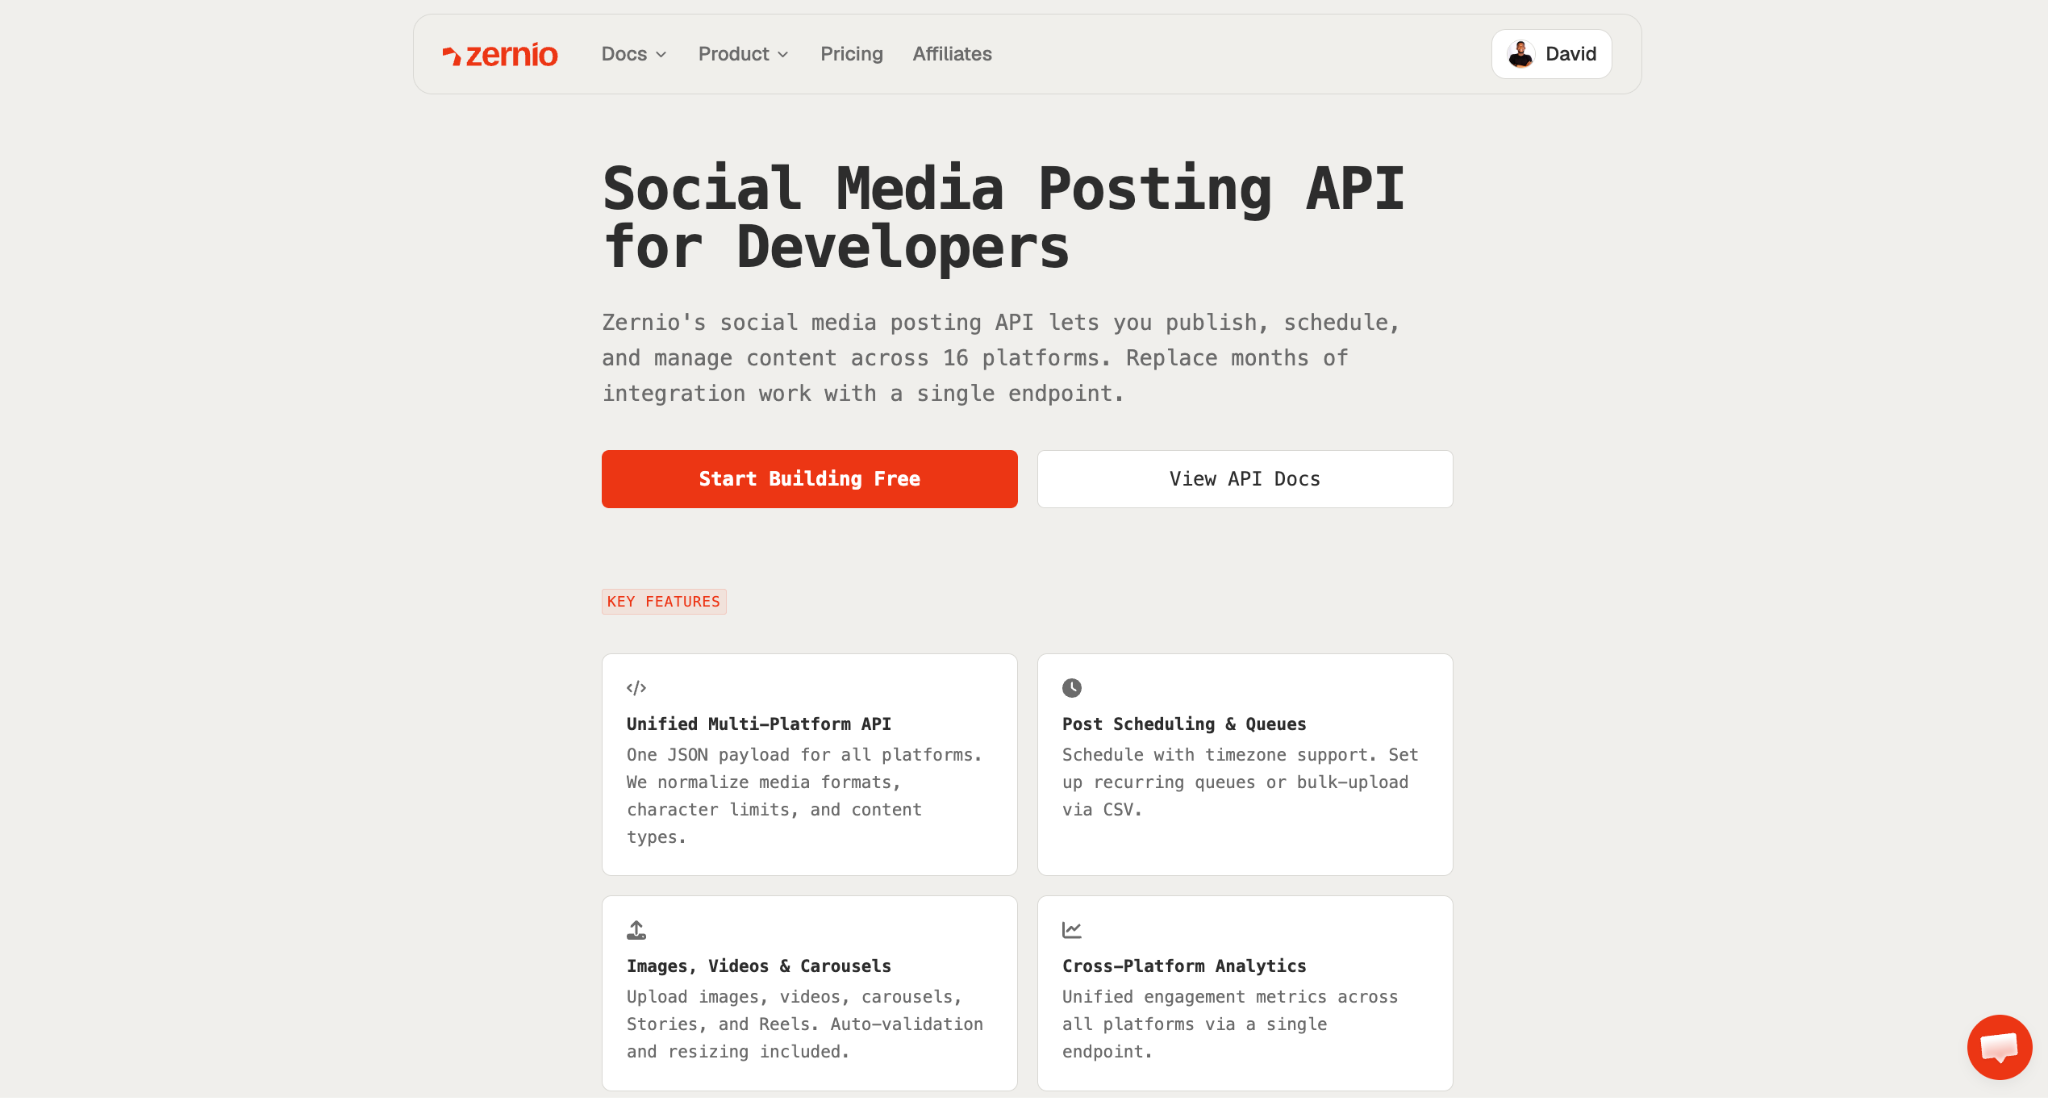
Zernio is a unified social media management and messaging API for scheduling and publishing posts, managing DMs and comments, retrieving post analytics, and managing cross-platform ads across 16 social media platforms.
With a single API integration, you can create post queues with defined time slots, manage conversations from a unified social inbox, analyse post and inbox performance, and create and manage social media ads.
Zernio gives you an API to build on: consistent JSON requests and responses, one auth token, a hosted MCP server for AI assistants, a unified social inbox, and your content hits Instagram, Slack, TikTok, X (Twitter), LinkedIn, YouTube, and ten other platforms in a single call.
Why Choose Zernio for Social Media Scheduling?
Managing social media scheduling across multiple platforms requires significant development and maintenance effort. Zernio simplifies this by providing a unified platform and API that handles social media publishing across multiple platforms.
Here are some reasons why Zernio stands out:
Unified API for Cross-Platform Scheduling: Zernio offers a unified API for scheduling and publishing content across multiple social media platforms. The API handles platform-specific requirements behind the scenes, including media uploads, API rate limits with built-in automatic retries, and a simplified authentication process across multiple platforms.
Zernio API provides built-in scheduling features such as bulk scheduling, content queues, and cross-platform publishing, giving you the flexibility to build a consistent social media scheduling workflow or integrations while Zernio handles the platform compatibility.
AI Agent Support: Zernio provides a hosted MCP server that allows MCP-compatible AI assistants and agents to interact with your social media workflows. You can connect Zernio to an AI assistant and use natural language to perform supported tasks such as scheduling and managing posts, retrieving analytics, and managing messages and social media ads.
Zernio also supports integration with low-code automation tools such as Make, Zapier, and n8n, allowing you to connect social media workflows with other applications and automate repetitive tasks without building custom integrations from scratch.
Zero API Maintenance for SaaS Apps: Building direct integrations with multiple social media platforms requires ongoing maintenance. Each platform has its own authentication requirements, API endpoints, permissions, publishing rules, rate limits, and API version changes. Zernio abstracts these platform-specific requirements behind its unified API and manages the underlying platform integrations to maintain compatibility with each platform’s API.
Centralised Dashboard: Zernio’s dashboard enables you to manage social media accounts, schedule posts, monitor analytics, and manage other social media activities from one place.
From the dashboard, you can connect and manage social accounts, organise scheduled content with a content calendar, track post performance, view API request logs and activity, and handle comments and DMs through a unified social inbox.
The dashboard also supports built-in DM automation workflows, cross-platform ads management, and webhook configuration. Having these capabilities in one place makes it easier to manage your social media infrastructure without switching between multiple platform dashboards.
Prerequisites
To follow this tutorial, you should have a basic understanding of Next.js and React. You’ll also need the following:
LLM API: An API key for OpenAI, Claude, or Google Gemini to generate social media content from user prompts.
Zernio API key: Required to authenticate requests to the Zernio API and schedule and publish posts across connected social media accounts.
Social media account: At least one supported social media account connected to Zernio for post scheduling and publishing.
Node.js: Required to install dependencies and run the Next.js application locally.
How to Build the Next.js App Interface
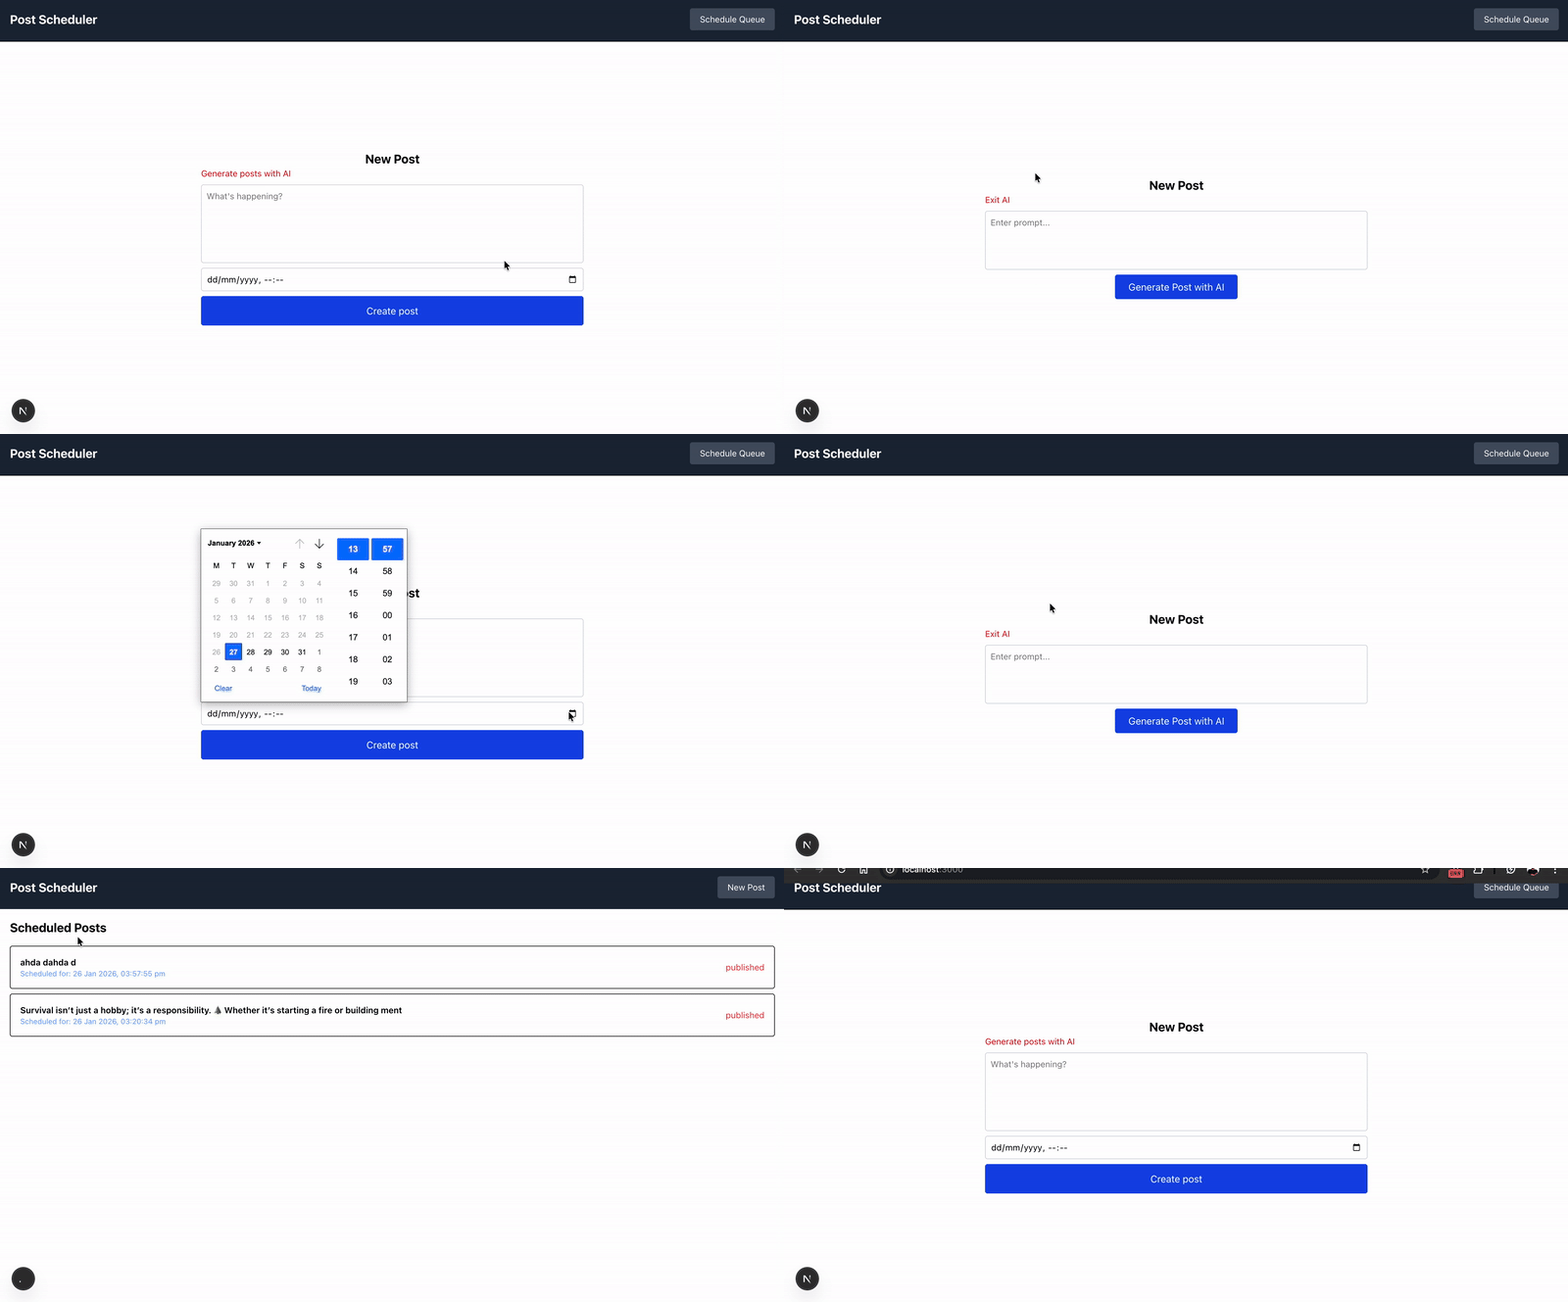
In this section, you’ll build the user interface for the application. The app uses a single-page route with conditional rendering to display scheduled posts, an AI prompt input, and a form for creating or scheduling posts.
Setup and Installation
Create a new Next.js project using the following code snippet:
npx create-next-app post-scheduler
Install the project dependencies. We’ll use Day.js to work with dates and times when scheduling social media posts. The @google/genai package provides access to the Google Gemini API for generating social media content.
npm install @google/genai dayjs utc
Next, create a .env.local file in the root of your Next.js project and add your Gemini API key:
GEMINI_API_KEY=<paste_your API key>
Once everything is set up, let’s start building! 🚀
Building the App User Interface
Before we proceed, create a types.d.ts file within your Next.js project and copy the following code snippet into the file:
interface Post {
    _id: string;
    content: string;
    scheduledFor: string;
    status: string;
}

interface AIFormProps {
    handleGeneratePost: (e: React.FormEvent<HTMLFormElement>) => void;
    useAI: boolean;
    setUseAI: React.Dispatch<React.SetStateAction<boolean>>;
    prompt: string;
    setPrompt: React.Dispatch<React.SetStateAction<string>>;
    disableBtn: boolean;
}

interface FormProps {
    handlePostSubmit: (e: React.FormEvent<HTMLFormElement>) => void;
    content: string;
    setContent: React.Dispatch<React.SetStateAction<string>>;
    date: string;
    setDate: React.Dispatch<React.SetStateAction<string>>;
    disableBtn: boolean;
    setUseAI: React.Dispatch<React.SetStateAction<boolean>>;
    useAI: boolean;
}
The types.d.ts file defines all the data structures and type declarations used throughout the application.
Copy the following code snippet into the app/page.tsx file:
"use client";
import Nav from "./components/Nav";
import { useState } from "react";
import NewPost from "./components/NewPost";
import PostsQueue from "./components/PostsQueue";

export default function Page() {
    const [showPostQueue, setShowPostQueue] = useState<boolean>(false);
    return (
        <div className='w-full h-screen'>
            <Nav showPostQueue={showPostQueue} setShowPostQueue={setShowPostQueue} />
            {showPostQueue ? <PostsQueue /> : <NewPost />}
        </div>
    );
}
The Page component renders the Nav component and uses conditional rendering to display either the PostsQueue or NewPost component based on the value of the showPostQueue state.
Create a components folder to store the page components used in the application.
cd app
mkdir components && cd components
touch Nav.tsx NewPost.tsx PostElement.tsx PostsQueue.tsx
Add the code snippet below to the Nav.tsx file:
export default function Nav({
    showPostQueue,
    setShowPostQueue,
}: {
    showPostQueue: boolean;
    setShowPostQueue: React.Dispatch<React.SetStateAction<boolean>>;
}) {
    return (
        <nav>
            <h2>Post Scheduler</h2>

            <button onClick={() => setShowPostQueue(!showPostQueue)}>
                {showPostQueue ? "New Post" : "Schedule Queue"}
            </button>
        </nav>
    );
}
Copy the following code snippet into the PostsQueue.tsx file:
"use client";
import { useEffect, useState, useCallback } from "react";
import PostElement from "./PostElement";

export default function PostsQueue() {
    const [posts, setPosts] = useState<Post[]>([]);
    const [loading, setLoading] = useState<boolean>(true);

    return (
        <div className='p-4'>
            <h2 className='text-xl font-bold'>Scheduled Posts</h2>

            {loading ? (
                <p className='text-sm'>Loading scheduled posts...</p>
            ) : (
                <div className='mt-4'>
                    {posts.length > 0 ? (
                        posts.map((post) => <PostElement key={post._id} post={post} />)
                    ) : (
                        <p>No scheduled posts available.</p>
                    )}
                </div>
            )}
        </div>
    );
}
The PostsQueue.tsx component displays previously created posts and their current status, indicating whether each post has been published or scheduled for later. While the posts are loading, a loading message is displayed. Once the data is available, it renders each post using the PostElement component.
Add the following to the PostElement.tsx component:
export default function PostElement({ post }: { post: Post }) {
    export const formatReadableTime = (isoString: string) => {
        const date = new Date(isoString); // parses UTC automatically
        return date.toLocaleString(undefined, {
            year: "numeric",
            month: "short",
            day: "numeric",
            hour: "2-digit",
            minute: "2-digit",
            second: "2-digit",
            hour12: true, // set to false for 24h format
        });
    };

    return (
        <div className='p-4 border flex items-center justify-between  space-x-4 rounded mb-2 hover:bg-gray-100 cursor-pointer'>
            <div>
                <p className='font-semibold text-sm'>{post.content.slice(0, 100)}</p>
                <p className='text-blue-400 text-xs'>
                    Scheduled for: {formatReadableTime(post.scheduledFor)}
                </p>
            </div>

            <p className='text-sm text-red-500'>{post.status}</p>
        </div>
    );
}
Finally, copy the following code snippet into the NewPost.tsx file:
"use client";
import { useState } from "react";

export default function NewPost() {
 const [disableBtn, setDisableBtn] = useState<boolean>(false);
 const [useAI, setUseAI] = useState<boolean>(false);
 const [content, setContent] = useState<string>("");
 const [prompt, setPrompt] = useState<string>("");
 const [date, setDate] = useState<string>("");

 //👇🏻 generates post content
 const handleGeneratePost = async (e: React.FormEvent<HTMLFormElement>) => {
  e.preventDefault();
  setDisableBtn(true);
 };

 //👇🏻 create/schedule post
 const handlePostSubmit = async (e: React.FormEvent<HTMLFormElement>) => {
  e.preventDefault();
 };

 return (
  <div className='w-full p-4  h-[90vh] flex flex-col items-center justify-center border-t'>
   <h3 className='text-xl font-bold'>New Post</h3>

   {useAI ? (
    <AIPromptForm
     handleGeneratePost={handleGeneratePost}
     useAI={useAI}
     setUseAI={setUseAI}
     prompt={prompt}
     setPrompt={setPrompt}
     disableBtn={disableBtn}
    />
   ) : (
    <PostForm
     handlePostSubmit={handlePostSubmit}
     content={content}
     setContent={setContent}
     date={date}
     setDate={setDate}
     disableBtn={disableBtn}
     setUseAI={setUseAI}
     useAI={useAI}
    />
   )}
  </div>
 );
}
The NewPost component conditionally renders the AIPromptForm and the PostForm. When a user chooses to generate content using AI, the AIPromptForm component is displayed to collect the prompt. Once the content is generated, the PostForm component is shown, allowing the user to edit, create, or schedule the post.
Add the components below inside the NewPost.tsx file:
export const AIPromptForm = ({
    handleGeneratePost,
    useAI,
    setUseAI,
    prompt,
    setPrompt,
    disableBtn,
}: AIFormProps) => {
    return (
        <form onSubmit={handleGeneratePost}>
            <p onClick={() => setUseAI(!useAI)}>Exit AI </p>
            <textarea
                rows={3}
                required
                value={prompt}
                onChange={(e) => setPrompt(e.target.value)}
                placeholder='Enter prompt...'
            />
            <button type='submit' disabled={disableBtn}>
                {disableBtn ? "Generating..." : "Generate Post with AI"}
            </button>
        </form>
    );
};

// 👇🏻 Post Form component
export const PostForm = ({
    handlePostSubmit,
    content,
    setContent,
    date,
    setDate,
    disableBtn,
    setUseAI,
    useAI,
}: FormProps) => {
    const getNowForDatetimeLocal = () => {
        const now = new Date();
        return new Date(now.getTime() - now.getTimezoneOffset() * 60000)
            .toISOString()
            .slice(0, 16);
    };

    return (
        <form onSubmit={handlePostSubmit}>
            <p onClick={() => setUseAI(!useAI)}>Generate posts with AI </p>
            <textarea
                value={content}
                onChange={(e) => setContent(e.target.value)}
                rows={4}
                placeholder="What's happening?"
                required
                maxLength={280}
            />
            <input
                type='datetime-local'
                min={getNowForDatetimeLocal()}
                value={date}
                onChange={(e) => setDate(e.target.value)}
            />
            <button disabled={disableBtn} type='submit'>
                {disableBtn ? "Posting..." : "Create post"}
            </button>
        </form>
    );
};
Congratulations! You've completed the application interface.
How to Integrate LLMs for Post Generation
LLMs such as Claude, OpenAI models, and Google Gemini can perform a wide range of language tasks, including text generation and completion, summarisation, rewriting, translation, classification, and content optimisation.
Here, you'll learn how to generate post content from the user's prompt using the Gemini API.
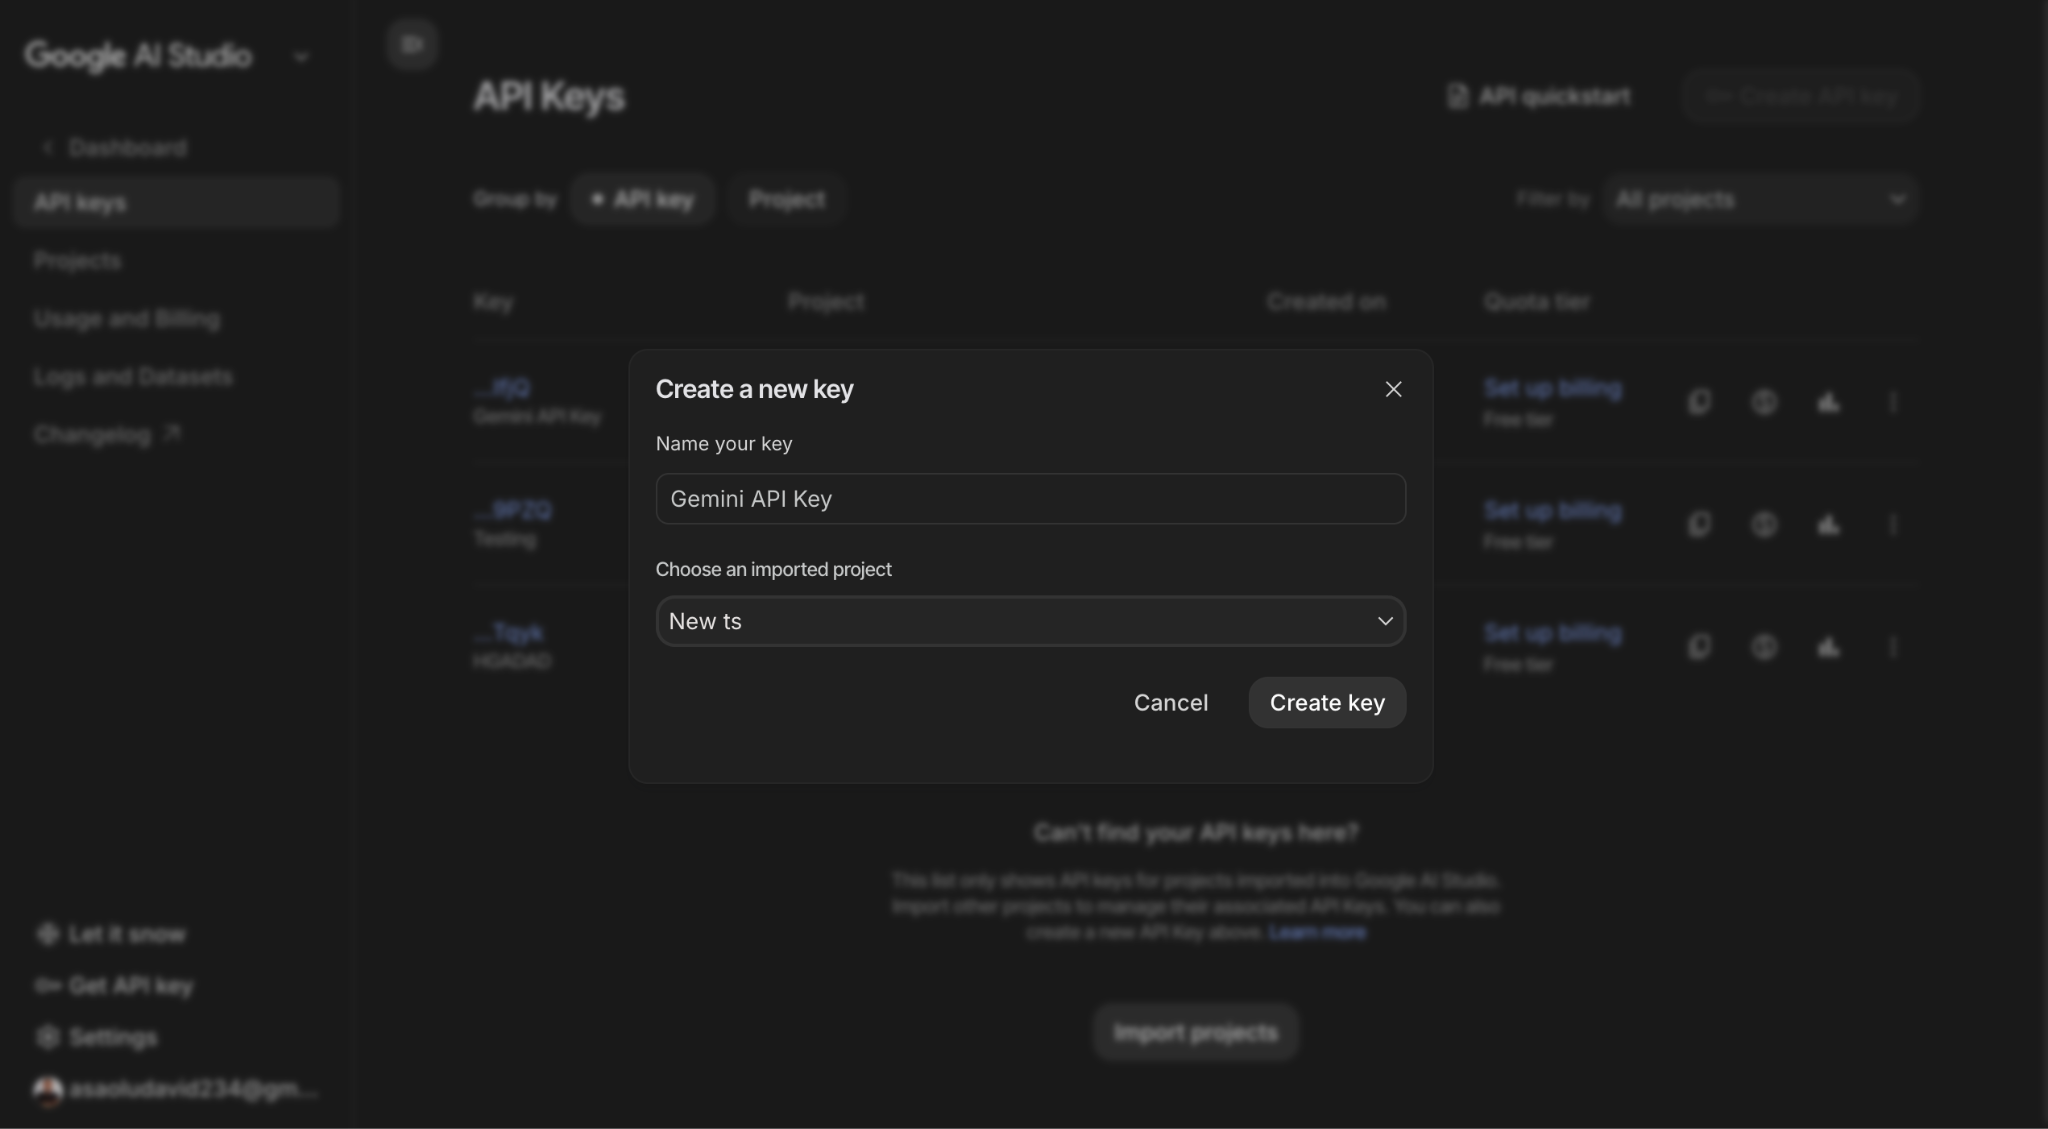
Before we proceed, make sure you've copied your API key from Google AI Studio.
Create an api folder inside the Next.js app directory. This folder will contain the API routes for generating social media content and creating or scheduling posts using the Zernio API.
cd app && mkdir api
Next, create a generate folder inside the api directory and add a route.ts file. Copy the following code into the file:
// 👇🏻 In api/generate/route.ts file
import { NextRequest, NextResponse } from "next/server";
import { GoogleGenAI } from "@google/genai";

const ai = new GoogleGenAI({ apiKey: process.env.GEMINI_API_KEY! });

export async function POST(req: NextRequest) {
    const { prompt } = await req.json();

    try {
        const response = await ai.models.generateContent({
            model: "gemini-3-flash-preview",
            contents: `
    You are a social media post generator, very efficient in generating engaging posts for Twitter (X). Given a topic, generate a creative and engaging post that captures attention and encourages interaction. This posts will always be within the character limit of X (Twitter) which is 280 characters, which includes any hashtags or mentions, spaces, punctuation, and emojis.

    The user will provide a topic or theme, and you will generate a post based on that input.
    Here is the instruction from the user:
    "${prompt}"`,
        });
        if (!response.text) {
            return NextResponse.json(
                {
                    message: "Encountered an error generating the post.",
                    success: false,
                },
                { status: 400 },
            );
        }

        return NextResponse.json(
            { message: response.text, success: true },
            { status: 200 },
        );
    } catch (error) {
        return NextResponse.json(
            { message: "Error generating post.", success: false },
            { status: 500 },
        );
    }
}
The api/generate endpoint accepts the user's prompt and generates post content using the Gemini API.
Now you can send a request to the newly created /api/generate endpoint from the NewPost component. Update the handleGeneratePost function as shown below:
const handleGeneratePost = async (e: React.FormEvent<HTMLFormElement>) => {
    e.preventDefault();
    setDisableBtn(true);
    const result = await fetch("/api/generate", {
        method: "POST",
        headers: {
            "Content-Type": "application/json",
        },
        body: JSON.stringify({ prompt }),
    });

    const data = await result.json();
    if (data.success) {
        setUseAI(false);
        setContent(data.message);
        setPrompt("");
    }
    setDisableBtn(false);
};
The handleGeneratePost function accepts the user's prompt and returns the AI-generated content.
How to Schedule Social Media Posts with Zernio API
Zernio lets you schedule and publish posts through its dashboard, automatically using AI agents, and programmatically via its API. It also offers multiple official SDKs for Node.js, Python, Go, Ruby, Java, PHP, .NET, and Rust, allowing you to integrate the API into SaaS apps and software applications using your preferred programming language.
In this section, you’ll learn how to schedule and publish content across multiple social media platforms using the Zernio API.
Step 1: Sign in to Zernio and connect your social media accounts
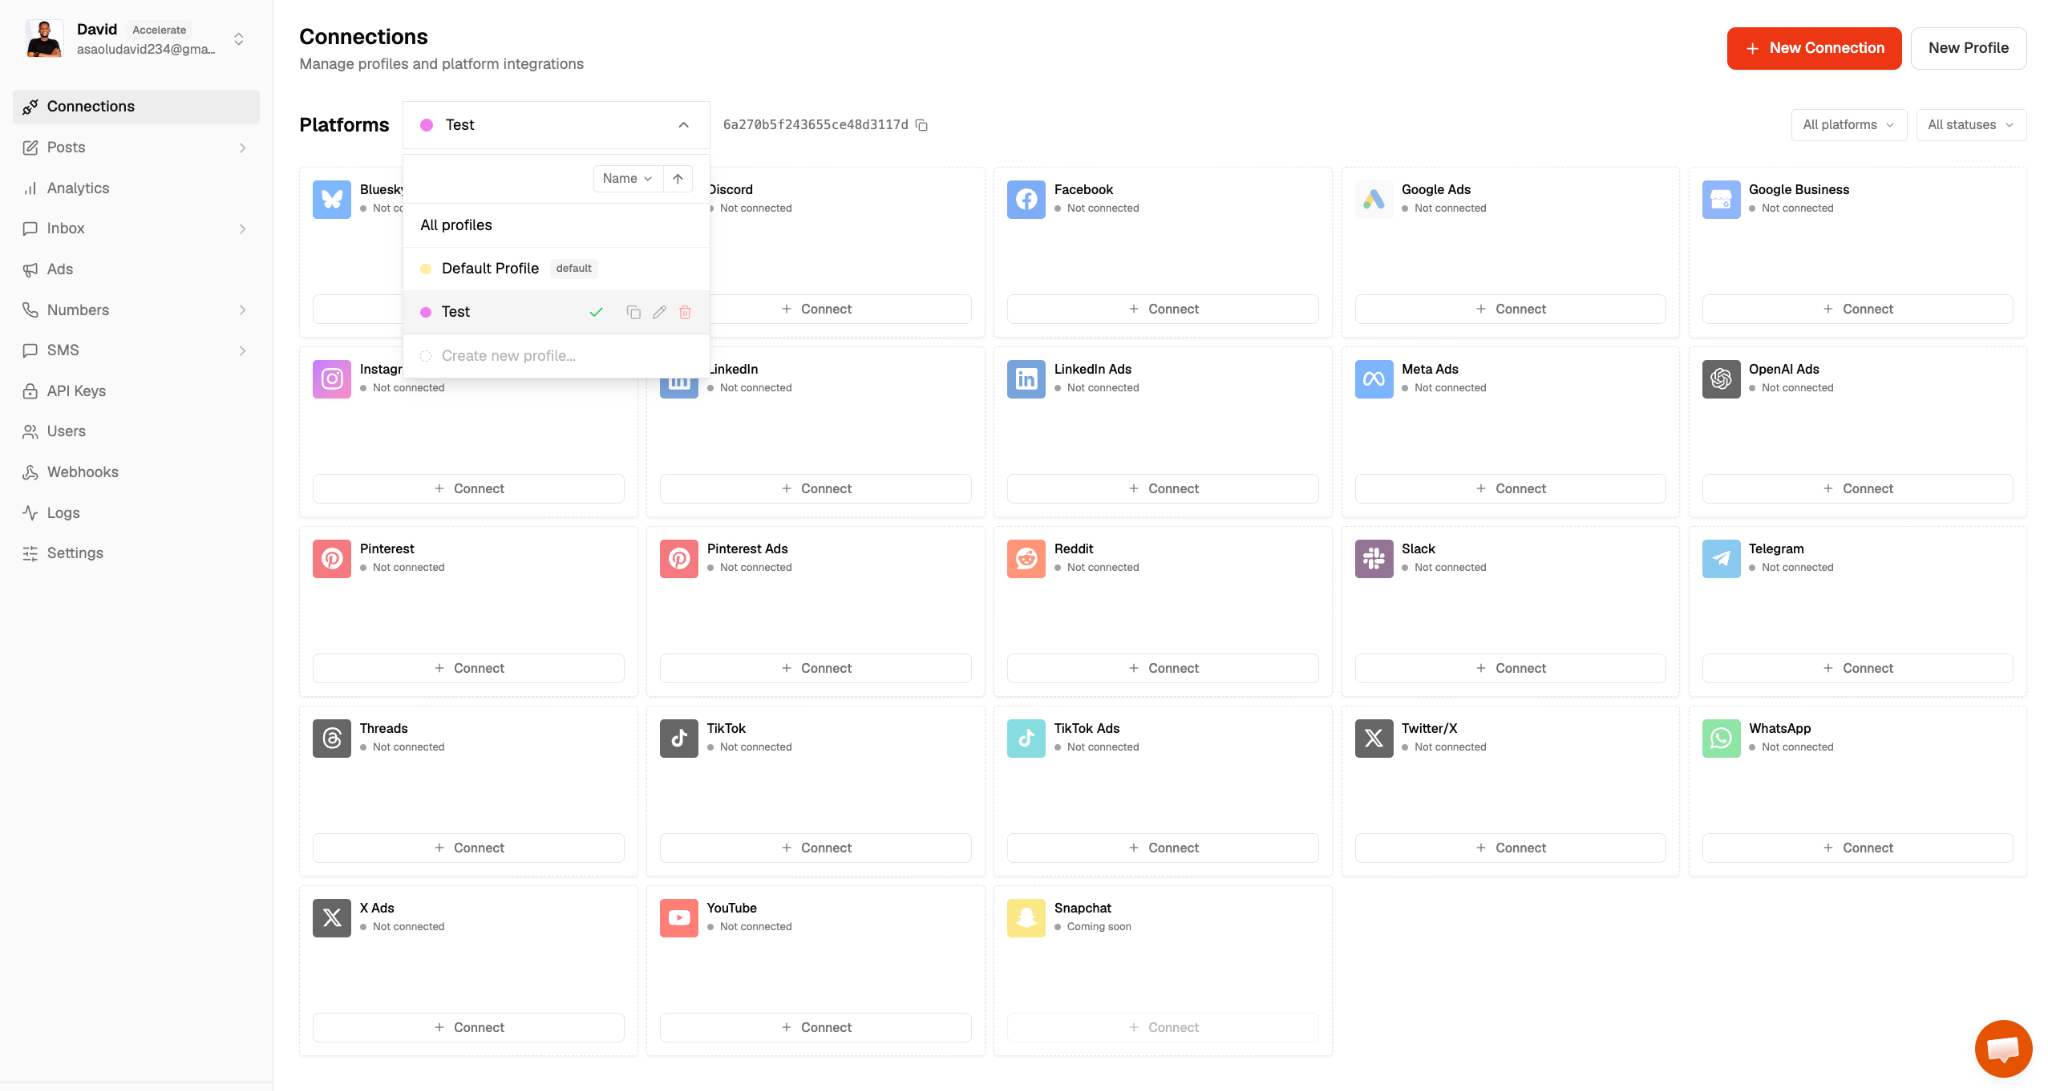
Log in to your Zernio account and select Connections from the sidebar to connect your social media accounts. You can also connect multiple accounts for the same social media platform by creating additional profiles.
Step 2: Get your API key and social media account IDs
Select API Keys from the sidebar menu in your Zernio dashboard, create a new API key, and store it in your project’s .env.local file.
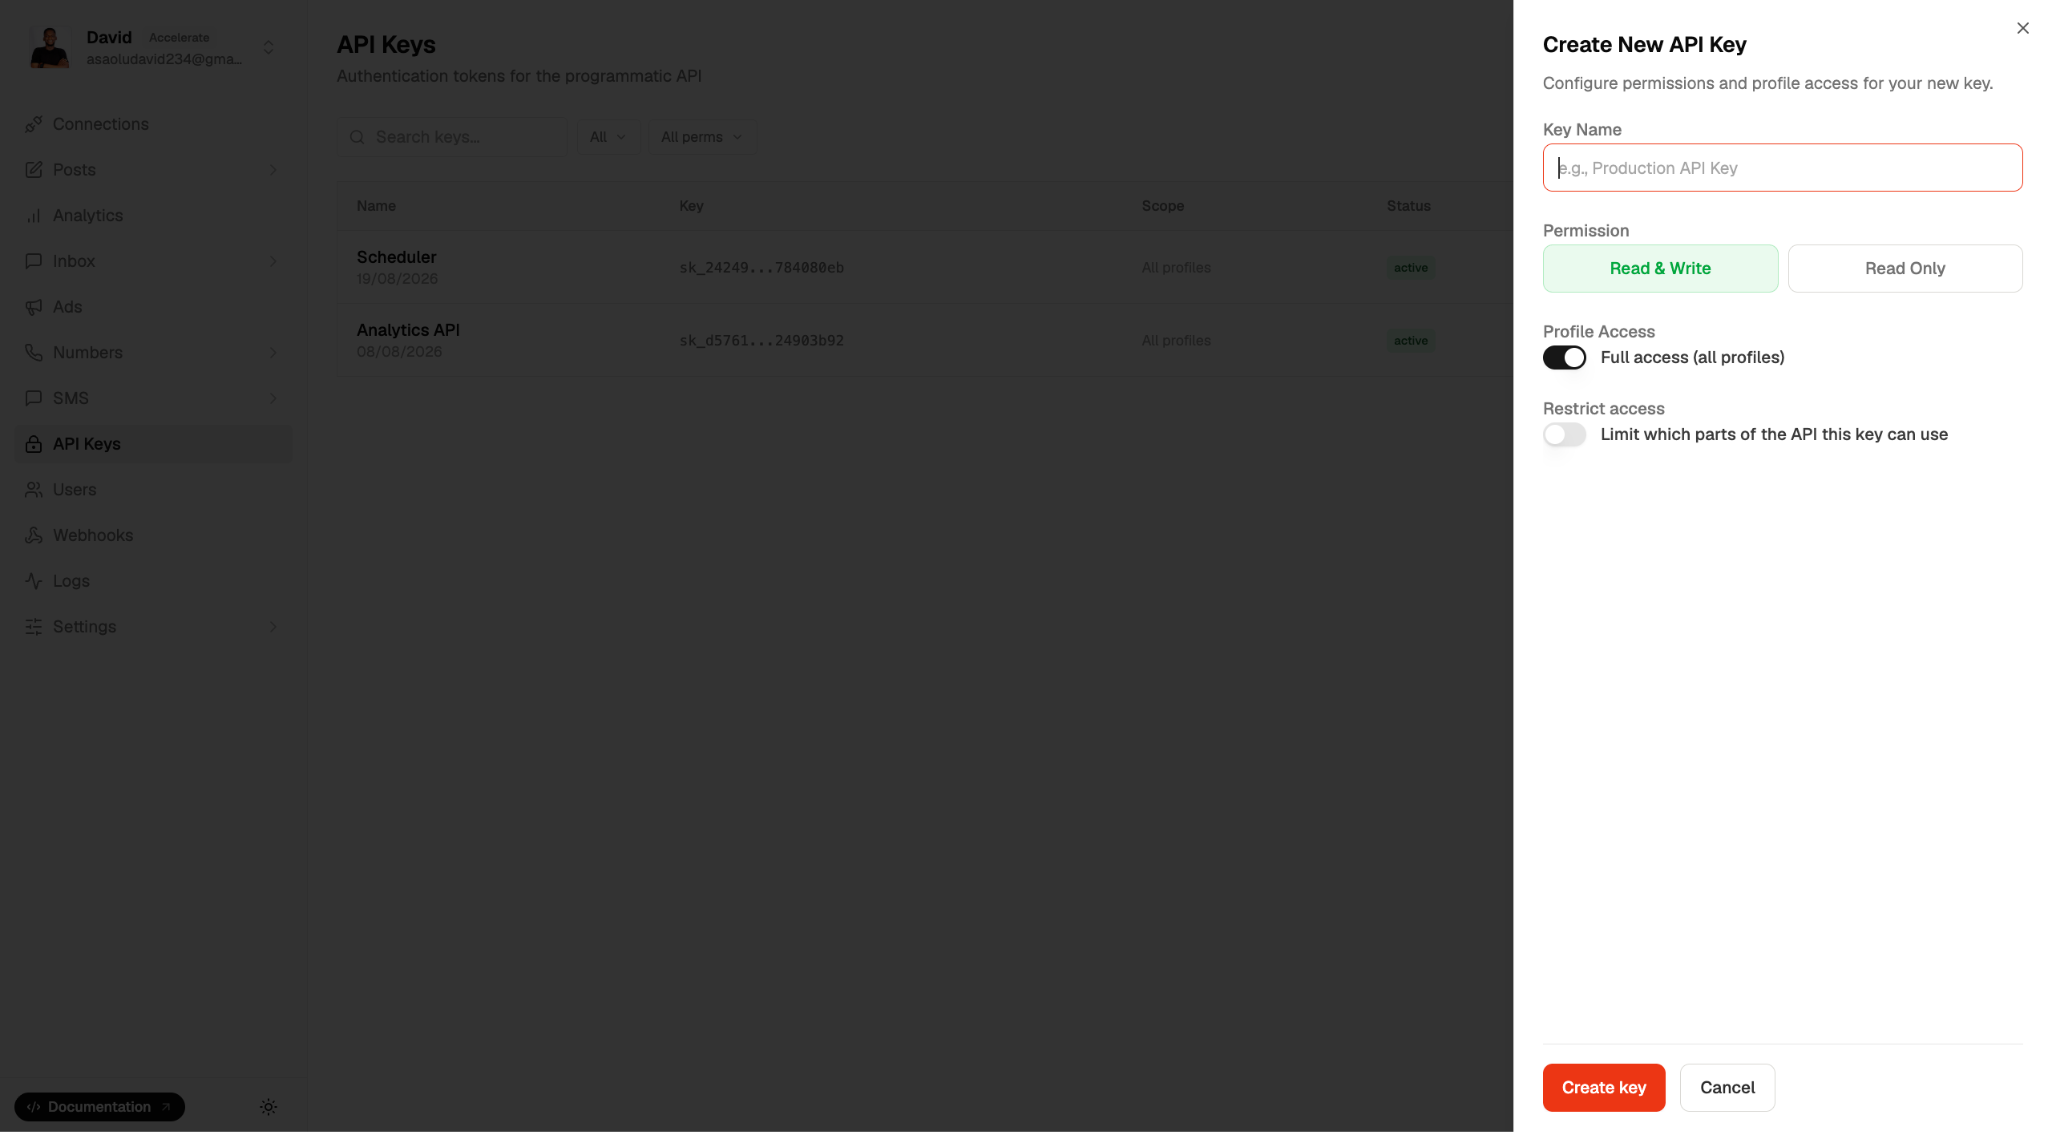
Next, return to the Connections page and locate the social media account you connected earlier. Click the Copy icon to copy its account ID and save it.
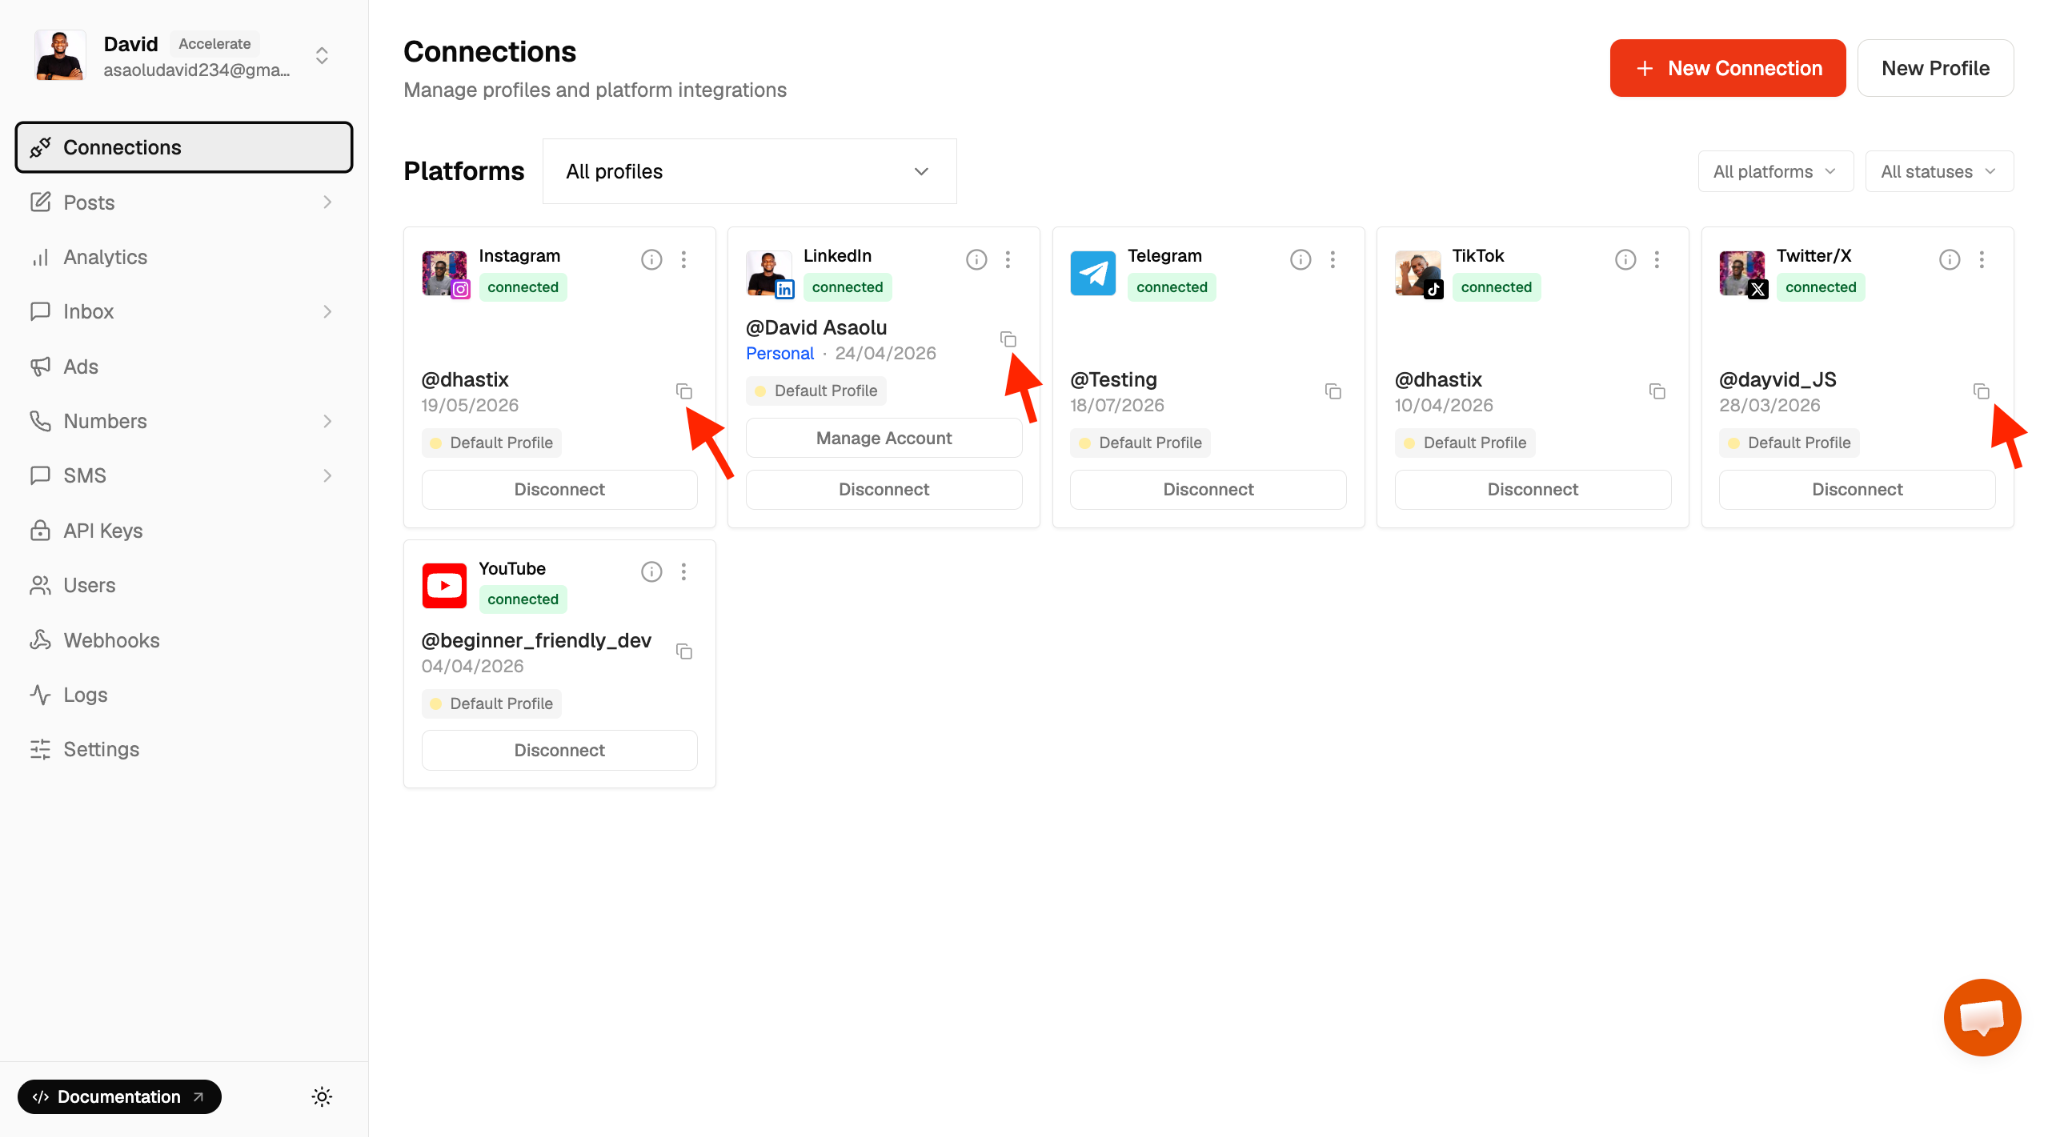
Add both the Zernio API key and account ID to your .env.local file as environment variables.
GEMINI_API_KEY=AI********
ZERNIO_API_KEY=sk_*******
TWITTER_ACCOUNT_ID=
LINKEDIN_ACCOUNT_ID=
Step 3: Schedule and Publish Posts using the Zernio API
Create an api/post endpoint to accept post content and schedule or publish posts using the Zernio API.
cd api
mkdir post && cd post
touch route.ts
Then, add the following POST method to post/route.ts:
import { NextRequest, NextResponse } from "next/server";
import utc from "dayjs/plugin/utc";
import dayjs from "dayjs";

dayjs.extend(utc);

export async function POST(req: NextRequest) {
    const { content, publishAt } = await req.json();

    // Determine if the post should be scheduled or published immediately
    const nowUTC = publishAt ? dayjs(publishAt).utc() : null;
    const publishAtUTC = nowUTC ? nowUTC.format("YYYY-MM-DDTHH:mm") : null;

    try {
        const response = await fetch("https://zernio.com/api/v1/posts", {
            method: "POST",
            headers: {
                Authorization: `Bearer ${process.env.ZERNIO_API_KEY}`,
                "Content-Type": "application/json",
            },
            body: JSON.stringify({
                content,
                platforms: [
                    {
                       platform: "twitter",
                       accountId: process.env.TWITTER_ACCOUNT_ID!,
                    },
                    {
                      platform: "linkedin",
                      accountId: process.env.LINKEDIN_ACCOUNT_ID!,
                    },
                ],
                publishNow: !publishAt,
                scheduledFor: publishAtUTC,
            }),
        });

        const { post, message } = await response.json();

        if (post?._id) {
            return NextResponse.json({ message, success: true }, { status: 201 });
        }

        return NextResponse.json({ message: "Error occurred", success: false }, { status: 500 });
    } catch (error) {
        return NextResponse.json({ message: "Error scheduling post.", success: false }, { status: 500 });
    }
}
From the code snippet above:
The
/api/postendpoint accepts the post content and an optional publishAt timestamp from the request body.If publishAt is not provided, publishNow is set to true, and the post is published immediately. If a time is provided, Day.js converts it to UTC and formats it for scheduling.
The endpoint then sends the post content, publishing options, and connected social account IDs to the Zernio API using the
ZERNIO_API_KEYstored in your environment variables.In this example, the post is configured for the connected X (Twitter) and LinkedIn accounts. You can add or remove platforms by updating the platforms array and providing the corresponding account IDs.
If Zernio successfully creates the post, the endpoint returns a 201 response with a success message. Otherwise, it returns an error response.
You can also add a GET method to the /api/post endpoint to retrieve posts that have already been created or scheduled:
export async function GET() {
    try {
        const response = await fetch(
            "https://zernio.com/api/v1/posts",
            {
                method: "GET",
                headers: {
                    Authorization: `Bearer ${process.env.ZERNIO_API_KEY}`,
                    "Content-Type": "application/json",
                },
            },
        );

        const { posts } = await response.json();

        return NextResponse.json({ posts }, { status: 200 });
    } catch (error) {
        return NextResponse.json(
            { message: "Error fetching posts.", success: false },
            { status: 500 },
        );
    }
}
Next, update the handlePostSubmit function in NewPost.tsx to send a POST request to /api/post. This will create or schedule the post and notify the user of the result:
const handlePostSubmit = async (e: React.FormEvent<HTMLFormElement>) => {
    e.preventDefault();
    setDisableBtn(true);

    const now = new Date();
    const selected = date ? new Date(date) : null;
    const publishAt = !selected || selected <= now ? null : date;

    const result = await fetch("/api/post", {
        method: "POST",
        headers: { "Content-Type": "application/json" },
        body: JSON.stringify({ content, publishAt }),
    });

    const { message, success } = await result.json();

    if (success) {
        setContent("");
        setDate("");
        alert("Success: " + message);
    } else {
        alert("Error: " + message);
    }

    setDisableBtn(false);
};
Finally, fetch all scheduled or published posts and render them in the PostsQueue component:
const fetchScheduledPosts = useCallback(async () => {
    try {
        const response = await fetch("/api/post", {
            method: "GET",
            headers: { "Content-Type": "application/json" },
        });
        const data = await response.json();
        setPosts(data.posts);
        setLoading(false);
    } catch (error) {
        console.error("Error fetching scheduled posts:", error);
        setLoading(false);
    }
}, []);

useEffect(() => {
    fetchScheduledPosts();
}, [fetchScheduledPosts]);
Congratulations! You’ve successfully built an AI-powered social media post scheduler using Next.js, Gemini API, and Zernio API.
The source code for this tutorial is available on GitHub.
Conclusion
In this tutorial, you’ve learnt how to build an AI-powered social media post scheduler with Next.js, using the Gemini API to generate content and the Zernio API to schedule and publish posts across multiple social media platforms.
By combining Zernio with generative AI models such as Gemini, AI assistants and agents such as Claude and OpenClaw, or automation tools such as n8n and Zapier, you can build automated workflows that keep your audience engaged with minimal manual effort.
The Gemini API also makes it easy to integrate AI-powered text, image, or code generation directly into your applications, opening up a wide range of creative possibilities.
Thank you for reading! 🎉